
A few years ago I got into 3D printing and bought an Anycubic Kossel Linear Plus printer to play with. It’s a so-called delta printer where instead of the bed, the head is moving into all three dimensions - looks more robotic, if you ask me. Unfortunately over the time the printer lost its dimensional accuracy. Maybe it never really was accurate at all. In my case items always seemed to be too small and some further investigations lead to inaccuracy in the Y-direction of nearly 5 percent. In the following I will describe how I was able to fix the inaccuracy. Maybe it will help you, too.
The Anycubic Kossel Linear Plus is a quite cheap, yet pretty good 3d printer to start with FDM printing. Having my own small plastic parts created was the last thing missing and so I was happy to get into FDM with the Kossel. But after a while I’ve noticed that even though you can fine print up to 0.1mm accuracy with the basic setup, the items I’ve created often didn’t fit, or I had to post process them to make holes bigger, you name it. To tackle the issue I created a very basic 3d model to compare the result with what I expected: a small cube with an edge length of 10x10x10mm with to legs of 100mm each in the direction of X and Y dimension (kalibrierung10cm.stl):
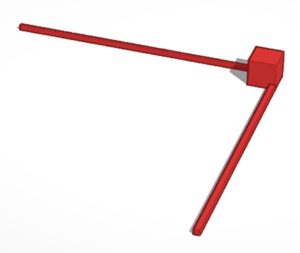
Height was accurate, so was the X leg. But the Y leg was too short. Instead of having 100mm it was 99,5mm long. That's a too high deviation to make things that fit together with non-printed items like wall mounts etc. After some research I came across the M92 command for setting axis stepps in every direction with X,Y,Z being 80 steps per unit in the default configuration. Obviously 80 steps per unit is not enough on Y-axis. The new value can be calculated by the following formula:
(80/100) * 99.5 = 80.4where 100 is the expected measurement, 99.5 the length actually printed. Based on the calculation M92 Y needs to be set to 80.4. To set the new value, enter
M92 Y80.4followed by M500 to save the settings. Unexpectedly though, more needs to be done here due to the nature of the delta printer.
Set, print, check, repeat
As mentioned above delta printers move the head into all three dimensions using three drivers that push and pull into their direction. Changing the steps per unit of one driver will affect everything else. First, and most important to avoid damages, the delta calibration and bed leveling needs to be repeated every time the steps per unit value gets changed. Otherwise the nozzle might move into the bed, damaging both.
Secondly, based on the ways the head is moved around by all three drivers on a delta printer, a new control unit needs to be printed and measured. Then the new value for steps per unit for Y needs to be calculated again, set, followed by delta calibration and bed leveling. And so on. With each iteration we’ll come closer to the 100mm. In my case I had to do 5 iterations to get as close as 0.2mm to the desired value with a steps per unit value of 81 for Y.
Since every iteration took more than 15 minutes to run, I declared 0.2 mm to be good enough.